Most desktops that “won’t turn on” still work. Usually the power isn’t reaching the PC, a connector inside has worked loose, or the screen never wakes up. Pay attention to exactly what happens when you press the power button, then follow the fixes for that symptom in order, starting with the ones anyone can do safely.
Key takeaways
- Note what you see first: no lights, lights only, fans that die, black screen, or blinking LEDs.
- Many dead-looking PCs come back after a new outlet, a flipped PSU switch or a swapped power cable.
- Dell, HP and ASUS all flash diagnostic codes. Counting the blinks tells you which part has failed.
- On a new AM5 build, a long black screen at first boot is often memory training, not a dead PC.
- Burning smells, scorch marks or a melted GPU power connector mean you should stop and get a repair.
Fact-checked
We checked these key facts against the sources named, on November 12, 2026:
- Club386 reported that both its PSU and its RTX 5090 were destroyed by a melting cable (source: club386.com)
- Notebookcheck covered an RTX 5090 whose connector melted despite ASRock’s TempGuard protection (source: notebookcheck.net)
- A spinning fan only proves the PSU can start (source: corsair.com)
First, what does “won’t turn on” look like for you?
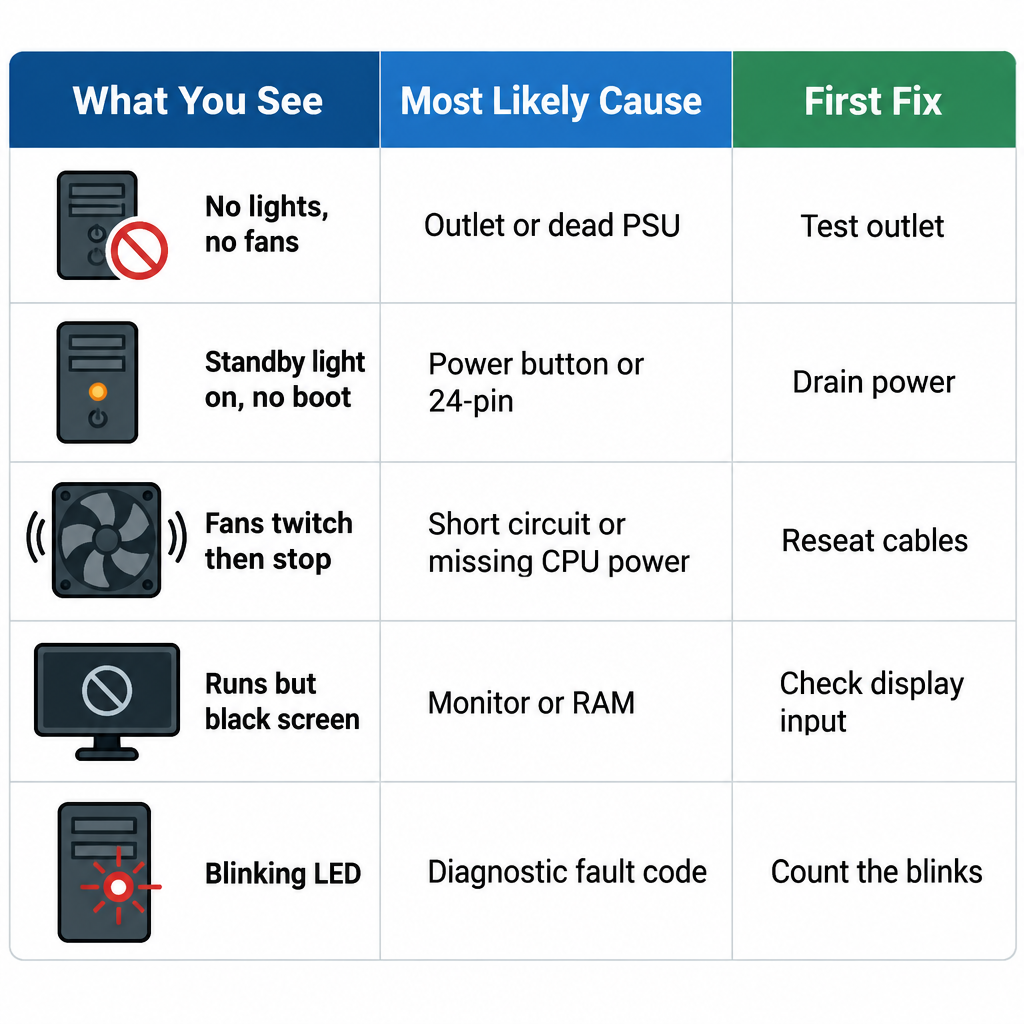
What happens in the first five seconds after you press the power button tells you where to start. “Nothing at all” usually means a power problem outside the case. Lights or fans with no picture usually point inside the case or to the monitor. Find your symptom in the table, then go to the section it names.
| What you see or hear | Most likely cause | First thing to try | Jump to |
|---|---|---|---|
| No lights, no fans, nothing | Outlet, power strip, PSU switch, cable or dead PSU | Test the outlet with a lamp | The 2-minute checks |
| Power or motherboard light on, nothing happens when you press the button | Case power button, loose 24-pin, PSU can’t deliver full power | Drain leftover power, then check the button wiring | Drain leftover power; Open the case |
| Fans spin for a second, then it shuts off | Short circuit, loose CPU 8-pin, failing PSU, bad RAM | Reseat power cables and RAM | Open the case |
| It runs (fans, lights) but the screen stays black | Monitor input, wrong video port, GPU, RAM, AM5 memory training | Check the monitor and which port you’re plugged into | Is it actually the monitor? |
| Power light blinking, or a colored LED on the board stays lit | The PC is reporting a specific fault | Count the blinks or read the LED label | Decode the lights and beeps |
Dead silent: no lights, no fans
This is the most common symptom, and the fix is often the easiest. Power isn’t reaching the power supply unit (PSU), or the PSU has failed. Do the 2-minute checks before anything else, then drain leftover power, then test the PSU.
Power or motherboard light on, but nothing happens
If a light on the board or case comes on, standby power is getting through. The PSU’s standby rail is alive, but the “turn on” signal isn’t reaching it, or the PSU can’t deliver its main rails. Suspect the front-panel power button, a loose ATX 24-pin connector or a weak PSU.
Fans spin for a second, then it shuts off
A brief twitch followed by a shutdown means the PSU tried to start and then shut itself off to protect the hardware. Common causes are a short (a stray screw, an extra standoff), a missing EPS 8-pin CPU power cable, or a failing component.
It runs, but the screen stays black
Your PC does turn on. It just isn’t showing a picture. Check the monitor first, then RAM and the graphics card. On a brand-new AMD AM5 build, wait before you change anything.
The power light is blinking or a colored LED stays on
Treat this as good news, because the PC is telling you what’s wrong. Dell, HP and most motherboard makers use these lights as diagnostic codes.
Pro tip
Before you touch anything, write down what you see: light color, how many blinks before the pause, and whether the fans twitch. That one note tells you which section to read, and it’s the first thing Dell or HP support will ask for.
What you’ll need
For the safe checks, all you need is a lamp or phone charger to test the outlet and a spare power cable (your monitor’s will often do). If you end up opening the case, add a Phillips screwdriver, a flashlight, your motherboard or PC manual, and something metal to touch so you can discharge static. A cheap PSU tester is optional.
The 2-minute checks anyone can do (no tools)
Every step in this section is safe for anyone and needs no tools. Between them they fix a large share of “no power” calls, so do them all before you open anything.
Check the outlet and power strip
- Unplug the PC and plug a lamp or phone charger into the same outlet. If it doesn’t work, the outlet or its circuit breaker is the problem.
- If you use a power strip or surge protector, look for a tripped switch or a reset button and press it.
- Plug the PC straight into a wall outlet you’ve just tested. Surge protectors can wear out after absorbing a big surge and quietly stop passing power.
Expected result: if the PC starts from the wall outlet, replace the power strip.
Flip the switch on the back of the PC
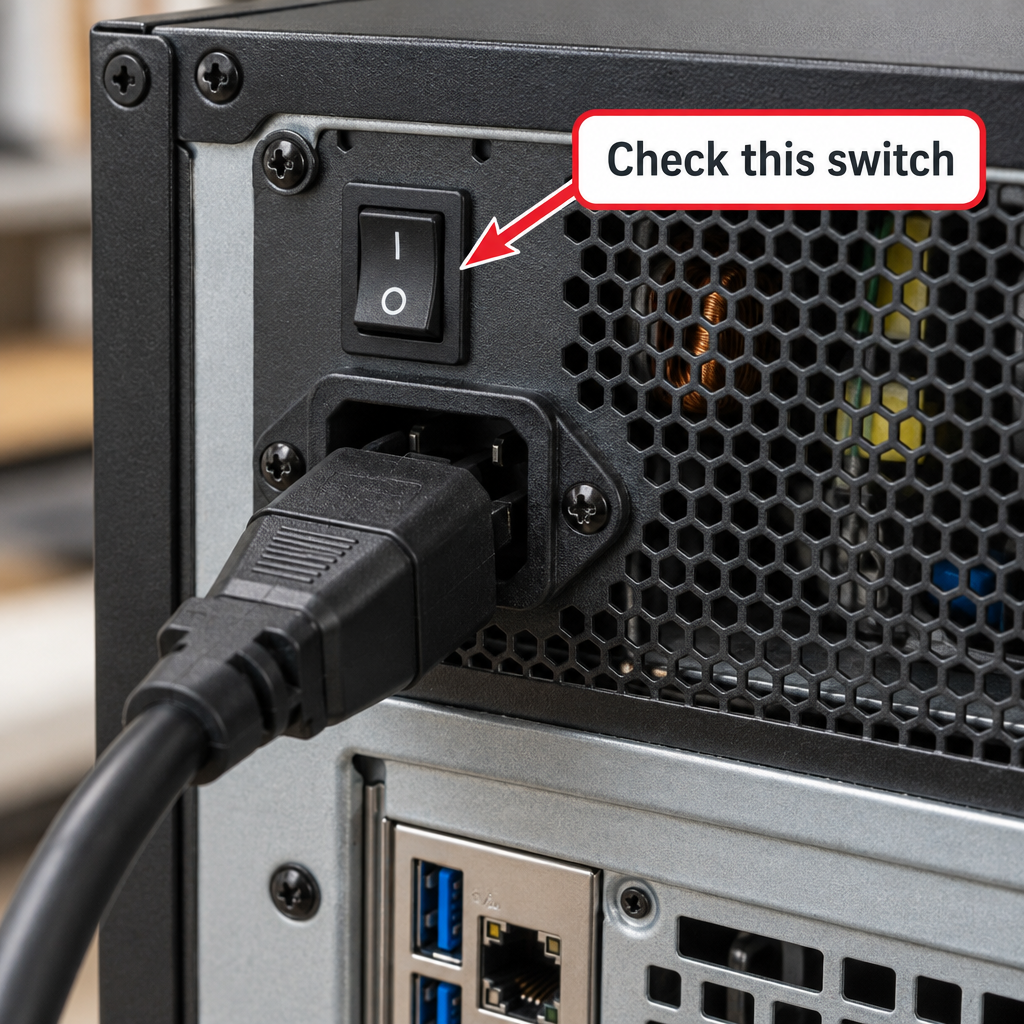
Most PSUs have a rocker switch on the back marked “I” (on) and “O” (off). Cleaners, kids and cable tidying knock it to O more often than you’d think. Set it to I and try again.
Swap the power cable with your monitor’s
Desktop PSUs use a standard C13 power cable, and many monitors use the same one. Push the cable firmly into the PSU, because a half-seated plug looks normal. Then swap in the monitor’s cable for a free test.
Unplug everything except power
Remove every USB device, the network cable, speakers and the display cable. Then try the power button. A shorted USB device or a faulty hub can stop a PC from starting. If it starts, add devices back one at a time to find the bad one.
Drain leftover power (try this after a storm or outage)
If your PC was fine last night and won’t start after a power cut, drain the power left stored in the PSU and motherboard. The board’s controller can get stuck after a power blip, and clearing the stored charge resets it.
Fix it
- Switch the PSU rocker on the back to O.
- Unplug the power cable from the PC.
- Press and hold the case power button for 15-30 seconds.
- Reconnect the cable, switch the PSU back to I and wait about 10 seconds.
- Press the power button once.
If that doesn’t work, the outage may have done real damage. HP’s Support Community notes that a surge during a power outage can damage the power supply, the motherboard, a component on the board or a connected peripheral. The PSU is the most likely casualty, and also the cheapest to replace, so test it next.
After an outage
Reset or bypass the surge protector, and plug the PC straight into a wall outlet you’ve tested with a lamp. A tripped strip and a dead PC look exactly the same.
Is it actually the monitor?
If the fans spin and the lights come on, rule out the screen before you blame the PC. A wrong input or a loose video cable causes a lot of “my PC won’t turn on” searches.
- Check the monitor’s power light. If it’s off, the monitor isn’t getting power. If it’s amber or shows “No signal,” the monitor works and is waiting for a picture.
- Pick the right input. Use the monitor’s buttons to cycle through HDMI, DisplayPort and any other inputs.
- Use the graphics card’s ports. If your PC has a separate graphics card, plug the monitor into the card’s ports (usually lower down on the back), not the motherboard’s video ports higher up. With a card installed, the motherboard ports often stay dark.
- Try a different cable and port. Swap HDMI for DisplayPort, or use another output on the card.
- Try a known-good display. A TV with HDMI works fine for a test.
Expected result: if any of these brings up a picture, the PC was fine all along.
Decode the lights and beeps your PC is giving you
Most modern PCs report startup faults with lights, not sounds. Prebuilt Dell and HP desktops blink the power button light in a pattern. Motherboards from ASUS, MSI, Gigabyte and ASRock usually have small labeled LEDs for CPU, DRAM, VGA and BOOT. Read the code before you start swapping parts.
Dell desktops
Dell power lights use amber and white. Count the amber blinks first, then the white ones, then wait for the pause before the pattern repeats. Dell writes these codes as “amber, white.” For example, 2,1 means two amber blinks followed by one white.
| Light pattern | What Dell says it means | What to do |
|---|---|---|
| Off | PC is off or isn’t receiving power | Do the 2-minute checks, then the PSU self-test |
| Solid amber | Meaning varies by model, so check the diagnostic guide for your system | Run the PSU self-test where applicable, then reseat the power cables |
| Blinking amber | PSU power is normal, but a device may be faulty or badly installed | Reseat RAM, the graphics card and other cards |
| Blinking white | Sleep state, not a fault | Press a key or the power button to wake it |
| 2 amber, 1 white (XPS, Vostro) | Processor failure | Contact Dell support |
| 2 amber, 2 white (XPS, Vostro) | BIOS ROM failure | Flash the BIOS, following Dell’s recovery steps for your model |
| 1 amber, 2 white (Precision) | Bad motherboard, power supply or PSU cabling | Run the PSU self-test and reseat the cables |
These meanings come from Dell’s diagnostic indicator articles for XPS, Vostro and Precision desktops. Other lines, such as Inspiron and OptiPlex, have their own tables, so look up your exact model on Dell’s support site with your Service Tag.
Did you know?
According to Dell’s XPS desktop diagnostic guide, a blinking white power light on an XPS or Vostro isn’t a fault. It simply means the PC is asleep.
HP desktops
On HP desktops the power light blinks red a set number of times, pauses, and repeats. Count the blinks in one cycle, then look up that number for your model. HP’s blink and beep code reference is document bph07107, and the service manual for your exact model has the full table.
Codes vary by product line. In the HP xw9300 workstation’s service manual, for example, 4 red blinks mean power supply failure, 5 a pre-video memory error, 6 a graphics card error and 7 a system board failure. So if your HP is blinking red 4 times, the power supply is a strong suspect. Confirm it against your own model’s table before you buy parts.
Count it twice
Count the blinks on a Dell (amber, then white) or HP (red) across at least two full cycles. Then look up your exact model’s table, because the same count can mean different things on different product lines.
ASUS motherboards (Q-LED)
ASUS Q-LED boards have four small LEDs labeled CPU, DRAM, VGA and BOOT. During startup they light up one after another. If one stays solid, that part is where startup stopped. ASUS’s fix order is to reseat the part first, then check the board’s QVL (qualified vendor list) or test one RAM stick at a time, reseat the graphics card, and finally reconnect the SATA or M.2 drive and tighten the M.2 screw.
Cheaper ASUS boards use Q-LED Core, where the case Power LED does the job. Its blink rate carries the code, and it means different things on Intel and AMD boards.
| LED / blink rate | Intel board | AMD board | Fix |
|---|---|---|---|
| CPU LED solid (Q-LED) | CPU not detected or not initializing | Same | Reseat the CPU and EPS 8-pin power, check for bent pins, check BIOS support |
| DRAM LED solid (Q-LED) | Memory problem | Same (on AM5, may be memory training) | Reseat RAM, try one stick, check the QVL |
| VGA LED solid (Q-LED) | Graphics problem | Same | Reseat the GPU and its power cables, try onboard graphics |
| BOOT LED solid (Q-LED) | No boot device | Same | Reconnect the SATA/M.2 drive, tighten the M.2 screw |
| Fast blink, about 0.25s cycle (Q-LED Core) | No DRAM detected | No CPU detected | Reseat RAM (Intel) or the CPU (AMD) |
| Slow blink, about 2s cycle (Q-LED Core) | No VGA detected | No VGA detected | Reseat the GPU, clean the PCIe contacts, try integrated graphics |
| Very slow blink, 4s on, 4s off (Q-LED Core) | No boot device | No boot device | Reconnect the SATA cable at both ends |
| Solid Power LED (Q-LED Core) | Normal boot | Normal boot | Nothing needed |
Did you know?
According to ASUS’s Q-LED Core FAQ, the same fast-blinking power LED means no RAM detected on an Intel board and no CPU detected on an AMD board.
Other boards: MSI EZ Debug LED, Gigabyte status LEDs
MSI’s EZ Debug LED and Gigabyte’s status LEDs work much like ASUS Q-LED, with four LEDs for CPU, DRAM, VGA and BOOT. A light that stays on points to that part. A DRAM light can also come from bent CPU socket pins, and some MSI manuals tie the VGA LED to other PCIe devices as well. Colors and timings differ between boards, so check your manual. Higher-end boards from all four makers, ASRock included, add a two-digit debug display. Its codes are listed in the motherboard manual.
Beep codes
Beep codes still exist, but many modern cases and boards have no speaker, so silence doesn’t mean “no fault.” If your board does beep, write down the pattern (for example, one long and two short) and look it up in the motherboard manual. The codes differ by BIOS maker.
Test the power supply
The PSU fails more often than any other part when a PC shows no lights and no fans at all, and it’s the safest major part to test or swap. Choose the most reliable method you have access to.
| Method | Tools needed | Skill level | How reliable |
|---|---|---|---|
| Dell built-in self-test (BIST) | None | Easy, case stays closed | Good pass/fail check on supported Dell models |
| Dell power-cycle LED test | None | Easy | Basic check for Dell models without a BIST button |
| PSU tester | Plug-in tester | Moderate, case open | Good: shows each voltage rail |
| Paperclip test | Paperclip or jumper | Moderate, some risk | Weak: proves the PSU starts, not that it’s healthy |
| Known-good PSU swap | A working PSU | Moderate to advanced | Best: settles the question |
Built-in self-test (Dell)
Many Dell towers have a BIST button on the back panel next to the power connector. On small-form-factor models you may need to remove the cover to reach it on the side of the PSU.
- Turn the PC off and leave the power cable connected.
- Press the BIST button.
- A solid, steady LED plus a spinning PSU fan is a pass. If the LED stays dark, or the fan doesn’t spin even though the LED lights, the test has failed.
- If it fails, reconnect the power cable and run the test once more. If it fails again, contact Dell Technical Support.
Some older Inspiron, XPS and Vostro desktops have no button. Dell’s alternative is to turn the PC off, unplug the cable from the PSU, wait 15-20 seconds and plug it back in. If the PSU’s LED lights for about 3 seconds and then goes out, the PSU passes.
PSU tester
A PSU tester plugs into the ATX 24-pin and other connectors and shows each voltage rail. It’s a better check than the paperclip test because it catches rails that are out of spec. You’ll need to disconnect the PSU cables from the motherboard first.
The paperclip test (with care)
This test shorts the green PS_ON wire on the 24-pin connector to any black ground wire, which tells the PSU to start without a motherboard.
Before you start
Do this with the PSU switched off and unplugged while you insert the clip, and only touch the 24-pin connector end. Never open the PSU itself: its capacitors can hold a dangerous charge even when unplugged.
- Disconnect the 24-pin cable from the motherboard.
- Bend a paperclip into a U and push it into the green wire’s pin and an adjacent black wire’s pin.
- Plug the PSU in and switch it on. The PSU fan should spin.
A spinning fan only proves the PSU can start. That’s why a PSU can “pass the paperclip test” while the PC still won’t turn on. The PSU may collapse under real load, or the fault may be the motherboard. Before you blame the board, swap in a known-good PSU, borrowed or bought from a store with an easy return policy.
Open the case: the fixes that work most often
If the outside checks haven’t fixed it, reseating parts is the next most common fix. Connectors work loose after a move, a bump or months of heating and cooling. Everything from here on is open-the-case only.
Before you start
Switch the PSU to O and unplug it, then touch bare metal on the case to discharge static. On a prebuilt still under warranty, check Dell’s or HP’s terms first, or call support before you open it.
Reseat power cables
Press firmly on the ATX 24-pin connector at the side of the motherboard until the clip clicks. Do the same for the EPS 8-pin CPU power cable near the top-left corner of the board. Without the EPS cable, a PC can light up or spin its fans for a moment and then do nothing. Reseat the graphics card’s power cables too.
Reseat RAM, one stick at a time
Open the clips, pull the memory sticks out and push them back in until both ends click. If that doesn’t help, boot with a single stick in the slot your manual recommends (often the second slot from the CPU). Try each stick in turn. If one stick boots and another doesn’t, you’ve found the bad module.
One stick first
When you’re testing RAM, boot with one stick in the slot the manual recommends before you blame the motherboard. A single bad module can stop the whole PC from starting.
Check the case power button wiring
The case’s power button connects to two pins on the front-panel header, labeled PWR_SW, PWRBTN or similar (your manual shows exactly where). Make sure the plug is on the right two pins. To rule out the button itself, plug the PSU back in, switch it on, and briefly touch both PWR_SW pins at the same time with the tip of a screwdriver. If the PC starts, the case button or its cable is faulty.
Look for shorts and burn marks
Shine a flashlight behind and under the motherboard. A loose screw, or an extra motherboard standoff that doesn’t line up with a mounting hole, can short the board against the case. That causes the classic “fans spin for a second, then off.” Also look for scorch marks, melted plastic or bulging capacitors. If you find any, stop.
Clear CMOS (reset the BIOS)
Clearing CMOS resets the BIOS/UEFI to factory settings. It fixes startup failures caused by a bad overclock, a wrong memory setting or a corrupted setting. It won’t fix a dead PSU or a dead board.
- Shut down, switch the PSU to O and unplug it.
- Use whichever method your board supports:
– Jumper: bridge the two Clear CMOS pins (often labeled CLRTC or JBAT1) with a jumper cap or a screwdriver tip for 15-30 seconds.
– Button: hold the Clear CMOS button on the rear I/O panel for 15-30 seconds.
– Battery: pop out the coin-cell battery for a few minutes, then put it back. - Reconnect power and start the PC.
Expect the BIOS date, boot order and any overclocking or XMP/EXPO settings to reset. On AM5 boards, memory training can make the first startup take longer, though features such as Memory Context Restore can shorten later boots.
That coin cell is a 3V CR2032 and usually lasts about ten years. It only keeps the clock and settings. A dead one causes clock resets, not a PC with no power. That’s why people who swap in a new CR2032 often find nothing has changed. If that’s you, go back to testing the PSU.
New build or just upgraded? Read this first
Fresh builds and recent upgrades have their own traps that can make a working PC look dead. Check these before you return any parts.
Wait out memory training
On AMD AM5 boards, the system tests and tunes your RAM on first power-up. It does this again after a CMOS clear, a BIOS update and some memory setting changes. While it trains, the screen stays black and you’ll see a yellow DRAM LED or Q-Code 15 on boards with a debug display. In 2022, TechPowerUp reported that the ASRock X670E Steel Legend needed “hundreds of seconds” to train memory at first boot or after a CMOS clear, before ASRock released a BIOS that shortened AM5 boot times.
So if you have a new AM5 build with a black screen and the DRAM light on, give it at least five minutes before you pull the plug. Cutting power partway through just starts the training over.
Make sure the BIOS supports your CPU
A brand-new processor in an older board may need a BIOS update first. The CPU LED stays lit, or nothing appears on screen. Check the CPU support list on the board maker’s site. Many recent boards can flash the BIOS from a USB stick without a CPU installed, using a feature such as ASUS BIOS FlashBack. Your manual will say if yours has one.
Check the GPU power connector for melting
High-end cards such as the NVIDIA RTX 5090 draw power through a 16-pin 12V-2×6 (previously 12VHPWR) connector, and some have melted. Hardware Unboxed found a 12V-2×6 cable that reached 175°C and fused to its be quiet! Dark Power Pro 13 PSU. Club386 reported that both its PSU and its RTX 5090 were destroyed by a melting cable. Notebookcheck covered an RTX 5090 whose connector melted despite ASRock’s TempGuard protection. Its owner saw repeated crashes, and the PC never shut itself down.
With the PC unplugged, pull the connector and look for browned or deformed plastic on the plug and the card’s socket. Make sure it seats fully with no gap, and avoid sharp bends right at the plug. Use the native cable from an ATX 3.0 or 3.1 PSU instead of an 8-pin-to-16-pin adapter where you can. If anything looks melted, don’t power the PC on again. Contact the card and PSU makers.
Do a minimal (barebones) boot
A minimal boot removes everything that isn’t needed to reach the BIOS, so you can add parts back one at a time and find the one that’s killing startup. Use this when the earlier fixes haven’t worked.
- Unplug the PSU and remove the graphics card (if your CPU has onboard graphics), all drives, all but one RAM stick and any expansion cards.
- Keep the motherboard, CPU and cooler, one RAM stick, and the PSU with its 24-pin and EPS 8-pin cables connected.
- Connect the monitor to the motherboard’s video port and start the PC.
- Expected result: the BIOS/UEFI screen or a “no boot device” message. Either one means the core parts work.
- Power down, add one part back, and test again. The part that brings the fault back is the culprit.
If even a minimal setup shows nothing, the PSU, motherboard or CPU is at fault. A known-good PSU swap is the next sensible test before you buy anything else.
How to tell if your PC is dying
PCs usually show warning signs before they fail completely. Here’s what each part tends to do first.
| Part | Warning signs |
|---|---|
| Power supply | Clicking or buzzing, random shutdowns under load (often while gaming), a burning smell, failing the Dell BIST |
| Motherboard | Bulging or leaking capacitors, dead after a surge, USB ports or audio dropping out |
| Storage drive | Starts but stops at a “no boot device” error, clicking (hard drives), files that won’t open |
| CMOS battery | Clock and date reset every time you unplug the PC |
| RAM | Random crashes and blue screens, DRAM LED faults, failing Windows Memory Diagnostic |
Note that storage and software faults stop a PC from booting. They don’t stop it from powering on. If your fans and lights work and you get an error message, the hardware is mostly fine. If it does start again but now runs sluggishly, look at the usual reasons a PC is slow before you replace anything.
Common mistakes that waste time
- Pulling the plug during AM5 memory training. It restarts the process.
- Buying a new CMOS battery for a no-power fault. A dead CR2032 doesn’t stop the PC from powering on.
- Trusting a passed paperclip test. It only proves the PSU starts.
- Plugging the monitor into the motherboard when a graphics card is installed.
- Skipping the surge protector check after an outage.
- Powering on again after smelling burning. That can turn one dead part into two.
Repair or replace? When to call in help
Stop and get help if you see sparks, smell burning, find scorch marks or a melted connector, or if a known-good PSU and a minimal boot still give you nothing. Beyond that point you’re guessing at expensive parts.
- Prebuilt under warranty: contact Dell or HP before you open the case. Give them the blink code and your Service Tag or serial number. Dell’s own advice after a failed BIST is to contact technical support.
- Out of warranty: a failed PSU is usually worth replacing, because it’s a standard part. Many repair shops will test the PSU, RAM and board with known-good parts. Ask what their diagnostic fee covers.
- Dead motherboard on an older PC: the replacement may need a new CPU and RAM to match. Price the whole upgrade against a new PC before you commit.
If you’re stuck choosing between a repair shop and buying a PSU yourself: when there are no lights at all after an outage, buying a quality PSU from a store with returns is a reasonable gamble on a self-built PC. On a prebuilt, use the maker’s support first. Its PSU may be a proprietary size.
FAQ
How do I fix a PC that won’t turn on?
Test the outlet, flip the PSU switch to I, swap the power cable and unplug all peripherals. Then drain leftover power and read any blink codes. If none of that works, test the PSU, reseat the 24-pin, EPS 8-pin and RAM, and clear CMOS.
Why won’t my PC start when I press the power button?
The most common reasons are no power reaching the PSU, a failed PSU, a loose front-panel PWR_SW connector or a loose motherboard power cable. Briefly shorting the PWR_SW pins with a screwdriver tells you whether the case button is the problem.
How do I force a PC to turn on?
Drain leftover power: switch the PSU off, unplug it and hold the power button for 15-30 seconds. Then reconnect and try again. Shorting the PWR_SW pins also starts the PC if the case button has failed.
How can I tell if my PC is dying?
Watch for random shutdowns, clicking or buzzing from the PSU, a burning smell, bulging capacitors, repeated blue screens and a clock that keeps resetting. Each points to a different part, as the table above shows.
Why won’t my PC turn on but the power light is on?
Standby power is getting through, but the start signal isn’t, or the PSU can’t deliver full power. Check the case power button wiring and reseat the 24-pin and EPS 8-pin cables. On a Dell, a solid amber light does not mean the same thing on every model, so check the diagnostic guide for yours. Dell recommends the BIST for applicable power-supply troubleshooting.
Why won’t my PC turn on with no lights at all?
Either no power is reaching the PC or the PSU has failed. Test the outlet with a lamp, bypass the power strip, check the PSU switch and swap the C13 cable. If it’s still dead, test or swap the PSU.
Why is my computer not turning on even when it’s plugged in?
A plugged-in cable doesn’t mean power is flowing. Surge protectors trip or wear out, outlets on wall switches get turned off, and the PSU rocker can be set to O. After a surge, the PSU itself may be damaged.
Why won’t my PC turn on but the motherboard light is on?
The board has standby power, so check the PWR_SW header, the EPS 8-pin and the 24-pin. If a CPU, DRAM, VGA or BOOT LED stays lit, that part is where startup stopped.
What does a blinking power light mean on my PC?
On Dell desktops, blinking amber points to a faulty or badly installed device and blinking white means sleep. On HP desktops, count the red blinks and look them up for your model. On ASUS Q-LED Core boards, the blink speed identifies RAM, CPU, graphics or boot drive problems.
Can a power outage kill a PC?
Yes. A surge when the power cuts out or comes back can damage the PSU, the motherboard, a component on the board or a connected peripheral. The PSU is the most common casualty, so test it first. A dead PSU doesn’t necessarily mean your motherboard is fried as well.